How to Banish Stubborn Mold from Your Walls
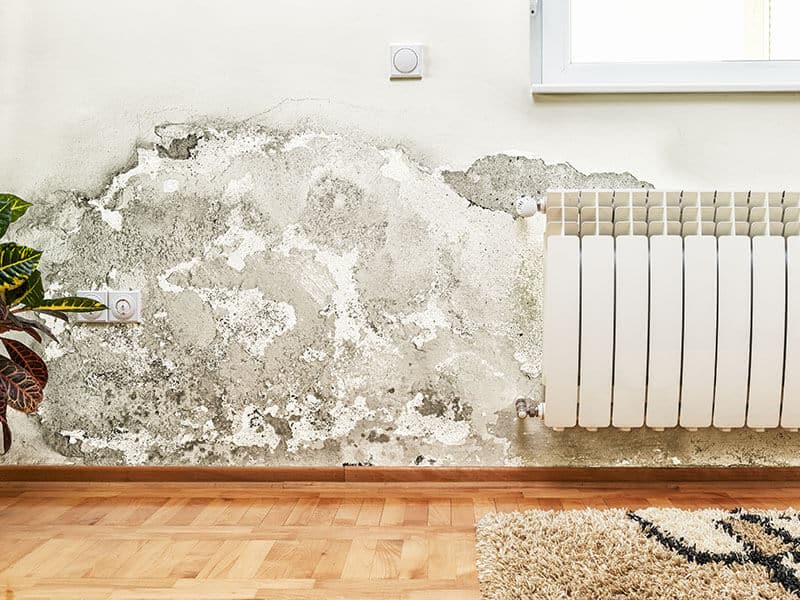
Are you asking yourself how to get rid of mold on walls because you just found some black spots in your house? If yes, reading this article is a must. Because what I am going to introduce here are ways to remove them economically, effortlessly, and permanently.
And even if there is no mold in your house, I think you should also look at this post for your reference. So do not go anywhere; your problem is about to be solved.
Dealing With Mold Is Not As Difficult As You Think
Nothing can distress you more when you spot molds right in your beloved house. But if they are just on the surface with small infestations, you can quickly deal with them.
There are many green and non-toxic solutions that you can buy to get rid of mold on walls. And by 3 key stages, you should:
- Detect the root problem of causing mold
- Remove stuff on the surrounding area to prevent the mold from spreading and briefly clean the wall
- And clean mold by using various mold-killing products (e.g., lemon juice, white vinegar, borax, Hydrogen Peroxide, etc.)
So why don’t you keep scrolling down the page to gain more knowledge regarding mold treatment? Let’s start the article with mold and how many types of it.
Mold – Annoying Fungus That Can Harm Your Health
No one likes molds. Because molds can ruin the beauty of your home, let alone their negative impact on your health. It also implies there is something wrong with your house, maybe because of the high indoor moisture.
So, before you learn about mold treatments, why don’t you get general information about what types first?
Types Of Mold
The table below will show you some popular types of mold with different characteristics and health issues.

How To Recognize Mold Sign In Your House
Mold can come in different sizes, textures, and colors. Look at your ceiling and walls, from the kitchen to basements, especially your bathroom, where the moisture is always high, to search for some weird spots on the surface.
If you find some suspicious black spots, they might be molds. Moreover, mold can cause wall cracks and peeling or discolored paint, making your walls less smooth, bulging, and unsightly.
Also, you can use your nose to sense and detect the musty smell. If any, your property is probably having mold issues.
In a worse scenario, mold can affect your health through daily allergy symptoms, like sneezing, runny nose, eye, and nose irritation, skin rashes, or hard to breathe.
Overall, molds not only ruin your furniture, fabrics, or other decorations but also negatively affect your health if you are exposed to mold in the air too long. So you must tackle mold treatment immediately before it spreads to the whole house.
Friendly-budget And Non-professional Ways To Get Rid Of Mold On Walls For Good
So, the main point in this article is how to remove mold on walls. Some of you might think calling house maintenance is the first thing to do. Technically, you can do it if the current situation of your wall is too bad with large mold infestations.
But if they are new with few black spots, there are many ways to deal with molds by utilizing some affordable chemicals; or even with some kitchen ingredients that you always have in your pantry.
There are 3 main stages of mold treatment on walls. First thing first, you need to know the causes of mold appearance – then, based on that, you will find appropriate solutions.
Stage 1: Determining What Causing Mold
You might deal with mold at least one time in your life as they are so easy to grow. And if you cannot find the root cause of mold prior to finding the proper treatment, they might come back over and over again. Here are some common reasons for mold appearances on walls.
- High Level Of Humidity: Molds love moisture. The primary cause of this fungus is excessive dampness. So, if you live in a humid climate, make sure you clean your house, tools regularly and allow air to circulate the house well.
- Condensation: Dampness and poor ventilation also result in condensation.
When the moist air interacts with cooler surfaces inside your house, like walls, windows, etc., they will transform from air to liquid forms, like a tiny drop of water. And time by time, the condensation of the liquids will allow the development of mold.
- Water Leaks: This one might be another popular reason that increases the chance of mold attack.
Water leaks might be associated with poor maintenance or construction, such as plumbing leaks, poor air-flow conditions inside the house, or human actions like not drying water on the walls, sinks, or anywhere indoors frequently.

Stage 2: Remove Stuff In Surrounding Areas and Clean The Wall
After knowing why there are molds in your house, if the problem is not too big and the mold is just on the surface, now you can proceed to the next stage to get rid of them.
However, if it is related to a serious situation (e.g., water leaks), contacting house maintenance services is what you should do immediately.
At this stage, you need to prepare some protectors for yourself to avoid mold spores from touching your body and some other stuffs, such as:
- A high-quality face mask
- Rubber gloves (disposable gloves are better)
- Hair and shoe covers
- Goggles
- Old long-sleeved clothes so after cleaning you can throw them away
- A sponge or scrub brush
- Washing Dish liquid
- A spray bottle
- A clean cloth
Then, move all of your stuff, like furniture, electricity machines, or any other stuff, from this room to another. If the furniture is too big or heavy to move, you can cover them with plastic sheets and tape to stabilize the sheets.
Also, use other large plastic sheets to spread on the floor to keep the cleaning chemical from ruining the floor. Make sure the surrounding area is all clear and thoroughly covered. If there is any window in this room, open them to allow air travel.
But do not forget to close this room’s door to prevent the mold spores from traveling to another room through the air.
The next step is cleaning the wall before removing molds. Use a dish sponge with some washing liquid to rub and remove the dirt on the walls. For more information about mold-cleaner agents and how to do it, the following part will show you.

Stage 3: Mold Removal With Simple Products
The following homemade mold removers can not only remove visible molds on the surface but also prevent the development of potential underlying mold. These mold-killer solutions are easy to access, affordable, and most importantly, some of them are natural and non-toxic.
Remember to prepare a spray bottle to pour these mold-killing liquids, a wall brush, or a scrubber sponge to clean. So, let’s start with the most popular one – Lemon juice.
Lemon Juice
Lemon juice is a natural mold remover that you can easily make at home. They not only clean molds but also leave a fresh aroma afterward.
Lemon juice has 5 to 8% acid content (1). And this content can prevent mold not only on walls but any other areas in your property. Spray the liquid on molds, then scrub them right away. With stubborn molds, you might repeat the same process daily for a better outcome.

Grapefruit Seed Extract
Another fruit-related product that you can use to kill mold is grape seed extract. Like lemon juice, this product can work well as an antibacterial and disinfectant liquid with a pleasant smell.
With 1 cup of water, you can mix with 10 drops of grapefruit seed extract. Shake the bottle well before spraying the solution on the mold area and leave it there for 10 to 15 minutes. Now, use a scrub to clean molds and mold stains, then wipe them away with a clean towel.
Moreover, you can leave the solution dry naturally as it is also a great way to prevent mold reoccurring in the same area. You can also repeat it every 2 to 3 days to get rid of mold for good.

Tea Tree Oil
This essential oil contains antimicrobial properties that make them become a good mold treatment. You can either combine tea tree oil with water or vinegar by mixing 2 teaspoons of tea tree oil with 2 cups of these liquids.
However, if you use white vinegar to mix with tea tree oil, you might expect a strong unpleasant smell from both of them. Now, spray the mixture on molds and allow the solution to stay there for more than 1 hour before wiping or scrubbing this affected area until it is clean from mold.

Vinegar
Surprisingly, this common kitchen ingredient is also a good mold cleaner. The acidic content in white vinegar can destroy 82% of mold types. You do not need to dilute white vinegar; spray them directly onto the blackened area and leave it there for around 1 hour without scrubbing.
I know vinegar’s odor is not so nice but do not worry, they will be gone after that. After 1 hour, you can come back to clean the wall with a sponge and warm water.
But in case there are still mold stains on a wall, you can use baking soda to solve this problem, which will be explained fully in the next part.

Baking Soda
Baking soda is an ideal mold-cleaner. Mix 2 cups of water with 2 tablespoons of baking soda to create a cleaning liquid and shake well until the mixture is dissolved.
Then, you spray the mixture on the mold and clean the area with a wall brush. Rinse the affected wall and spray again, but you do not have to scrub this time. Just let them dry naturally.
Another way to remove mold by baking soda is to make a paste with the ratio of 1:1 of baking soda and water. But you should not pour it on the spray bottle; you can only place the paste on the affected area and leave them dry, then clean this place with a scrub until the mold is gone.
Though baking soda is not as strong as vinegar in cleaning mold, they are really good at absorbing mold’s musty smell.

Borax
A non-toxic idea to remove mold is using borax. And you can easily find them in your local grocery store at a low price. To make the solution, pour 1 cup of borax into 1 gallon of hot water and stir/shake them well until fully dissolved.
Use a spray bottle to spray the mixture on mold, then scrub and clean the mold with a stiff brush. You do not have to rinse your wall afterward; just let it dry naturally.
You should see the video below:
Hydrogen Peroxide
Hydrogen peroxide is a blue liquid that you can use to get rid of mold on walls as well. You can apply them to porous and non-porous walls.
However, you should check whether the surface can be easily discolored by using this product. So just spray hydrogen peroxide on a tiny surface to test first. If it does not affect the color, keep spraying on a large scale.
For porous surfaces, let’s wait for 10 to 15 minutes. Then you can use a sponge or any wall scrub to clean and remove molds. Once your wall is mold-free, use a towel to wipe the wall dry.
For non-porous material, apply the ratio 1:1 of hydrogen peroxide and water, then spray on the area and leave it for 15 minutes as well. Afterward, clean the wall again with warm water and let it dry.

Bleach
This product is not a natural mold remover. However, you can use normal bleach to clean mold on non-porous surfaces. Also, check for the discoloration degree when you use bleach on the wall to make sure that they will not leave an unsightly surface with many discolored spots.
Use 1 part of bleach to mix with 3 parts of water and spray them on the blackened place. Wait for 10 to 30 minutes and clean with a wall scrub after that. Finally, you can rinse with water and wipe a paper towel to dry the wall.
Watch this video to know more:

There are many stronger chemicals to deal with mold that you can buy at stores. But as they are strong, these chemicals can harm your health. So as I mentioned above, if your walls (or house) are full of mold, let the pro remove them as they know how to use chemicals properly.
Besides, these solutions cannot be applied to all kinds of walls, so keep reading for more information about the proper mold killer for your walls.
Types Of Walls And Choosing Suitable Mold Removal Agent To Clean
There are various wall materials that come with different requirements regarding mold treatment. Here are 4 main groups of some wall types with relevant solutions.
Drywall
Drywall has a porous surface; therefore, bleach is not really an ideal liquid to clean mold on drywall. Instead, use milder solutions like baking soda, white vinegar, or hydrogen peroxide to get rid of black mold. There are 4 basic steps to remove mold as drywall such as:
Step 1: You should check and determine the mold-affected section on your walls. If you see the drywall structure is still fine without any bow or worse damages, you can mark the affected area and move to the next step for cleaning.
Step 2: Cover the surrounding floor and area. During the cleaning process, mold can travel through air or spill on the floor, so you must cover it with a big sheet. If possible, remove the furniture or cover them as well.
Step 3: Clean the area with baking soda, white vinegar, or hydrogen peroxide, as explained above. Or you can use a specialized mold-killer chemical. Apply the agent on the affected area, use a sponge and scrub it (but not so hard) to remove the spot.
Step 4: With some tough stains left on the drywall, you can use stain-resistant paint to cover it.
Replace The Affected Areas On Drywall
But if the affected area on your drywall is underlying deeply, nothing you can do but replace the wall. Search for anti-mold drywall on the market, you can find some. But in case you just want to replace the affected area only on your drywall, here are 7 simple steps to do it:
Step 1: Clean the surrounding areas and cover them with plastic sheets to prevent mold spores.
Step 2: Mark the area where it is impacted by mold. You should mark the affected larger as the unseen mold might already spread to another place.
Step 3: Use a knife to cut the affected area thoroughly and carefully. The thickness of this removal region should cover at least two wooden beams beneath the wall.
Step 4: Remove the mold-area wall and put it on the sheet. Make sure the mold-side is up.
Step 5: Vacuum up the room and avoid any mold left.
Step 6: If possible, you should paint the wall with mold-resistant paint before replacing the new drywall. If so, remember to paint both the front side and the back side of the new drywall.
Step 7: Replace the new section of your drywall but ensure the new one has the same size as the missing area. Then stabilize it with screws, cover the crack between the old and new section (if any) and leave it there for 24 hours.
Step 8: After 1 day, now you can clean and make the surface of your drywall smooth again.
Brick, Stone, Concrete, And Cement Wall
These materials also have porous surfaces. Once again, white vinegar or hydrogen peroxide will help you clean molds, even the root of it.
However, you can try diluted bleach and water (1 part of bleach mixed with 4 parts of water). Do not use bleach directly on these walls as it will damage the surfaces.
Spray the solutions on the wall, then scrub the area thoroughly until you can completely clean the mold. At this point, you can also apply vinegar and water with a ratio of 1:1 to disinfect your wall to prevent mold from coming back.
Similarly, what you need to do to remove mold on these material walls are:
Step 1: Prepare the Area by covering the floor or you can check if your furniture or stuff has been affected by mold or not. If yes, you should throw it away. If not, just simply move it to another room or cover it with sheets.
Step 2: Use white vinegar, hydrogen peroxide, or diluted bleach with water (for tough mold) to clean. After applying one of these solutions on the wall, use a brush and scrub until there are no black spots left.
Step 3: Rinse and clean the wall again with warm water and use a cloth to dry it. Leave it there for 1 day for complete drying.
Step 4: Vacuum the surrounding area to make sure you can get rid of mold completely.
Wallpaper
All-natural mold killers such as tea tree oil, grapefruit seed extract, or vinegar can be good friends to your painted wallpaper wall in killing molds. Instead of using a stiff wall brush, you should use a sponge to wipe and clean the mold surface without ruining your wall.
Step 1: Based on the above solution ratios (for tea tree oil, grapefruit seed extract, or white vinegar), you mix it on a spray bottle.
Step 2: Spray the solution affected section on the wall. But to make sure the solution works well with your material wall, you should test it first in an inconspicuous area. If there is no discolor or damages to your wallpaper, keep doing that with the affected area.
Step 3: Use a sponge and clean the mold carefully and gently until the black mold is gone. Avoid making your wallpaper too wet.
Step 4: Clean the wall again with water, then wipe it with a clean cloth. Or you can skip the rinsing step and let them dry naturally. The acidic properties in vinegar can be absorbed well into the wall, reducing the change of mold appearance in the future.
Cinder Block Walls
Though cinder block walls are stronger than the other mentioned walls, the attack of mold is possible. As they are tough and long resistant, cinder block walls are normal outdoors, so rain, flood, or melted snow are one of many reasons to increase the moisture that causes molds.
So here are some steps for you to clean the cinder block wall.
Step 1: You should vacuum the wall first. You should use a specialized mold vacuum that you can rent from a cleaning solution store. If possible, please wait for dry weather to do it.
Step 2: Mix the bleach and water in the mentioned ratio. Or for better results, you can also add 1 ounce of powdered detergent and 1 ounce of sodium orthophosphate to the bleach mixture. Shake well before using.
Step 3: Spraying the solution or using a sponge to apply it on a wall. Scrub the affected area well with a stiff brush.
Feel free to add more cleaning agents and let them sit for around 20 minutes. You do not have to wipe the wall with a towel; simply rinse it and leave your wall dry by air.
Step 4: Vacuum again to clean dead mold spores.
Step 5: Remember to clean the cinder wall frequently to eliminate the chance of mold coming back.

Mold Inside Wall? Well, Here Comes A Bigger Problem
As mold appears inside the wall, you will not see it. But it will endanger your health, especially when you have allergies, asthma, or any issue in breathing. So once you have these symptoms daily at home, your wall is probably exposed to mold from the inside.
Calling for expert help is a must as they know how to treat and get rid of the mold well. Please do not do it yourself as it might affect your health, or unless you are a professional mold-killer.
What Should You Do To Prevent The Potential Mold?
The consequences of mold to your health are tremendous, particularly long-term mold. And the cost that you have to pay for fixing them is not cheap.
So why don’t you start to prevent mold growth from the first day? After years of studying, I can finally come up with some easy and affordable (or cost-free) ways to avoid mold. Here are 8 appropriate methods that you can do to limit the future appearance of mold.
- Install Whole-house Dehumidifiers: But if your budget is limited, you can buy a small electric dehumidifier and place it somewhere that you think is easily exposed to mold.
Do not forget to clean your dehumidifier frequently; otherwise, the water in it can become another potential cause to increase mold risk.
- Buy a Hygrometer: You can place them in your bathroom, kitchen, or basement, basically, anywhere that you want to check the moisture level regularly. The ideal humidity should be from 30% to 60% (2).
- Open The Window and Close The Door: Keep your rooms, especially those that have high moisture levels, well-ventilated so they can be dry all the time.
The kitchen and bathroom are the 2 high-humidity rooms, so whenever you cook or bathe, you should open the window to allow the moisture to fly out. But you also should close the door to prevent moisture from traveling around your house.
- Install Exhaust Fans: These fans can be a good yet cheap solution to circulate air in the high-affected areas. But if you cannot install exhaust fans, use a normal fan (e.g., stand fan) to dry the high-moisture room regularly to prevent mold growth.
- If Possible, Use Hard Floors: For a room like a basement or a laundry room, though carpet can keep your feet warm in the winter, carpet can also lock the mold into it, increasing the chance of mold attack. So hard floors are much better for these rooms.
But if you already used carpet, clean them regularly with good carpet cleaning products that you can easily buy in any supermarket.
- Wipe Your Bathroom Walls and Doors After Using: This routine habit is important to get rid of mold. If you have a shower curtain, make sure you will shake them to remove all excess water on it and allow the air to circulate around the curtain’s sides.
- Clean Your Home Daily or Weekly: Remember, mold is easy to grow and spread to another place, so you have to keep your home dry and clean.
You can use any products that I just mentioned above to clean these areas. They work well on many surfaces, not only walls.
- Keep Your Floor Clean and Clear: Try not to drop any food or drink as food sources also cause mold.
- Use Mold-resistant Paint: There are various mold-resistant paints in the market. So whenever you rebuild/repaint your house, you can use them in high mold-exposure rooms.
- Check For Leaks Or Cracks: If these leaks and cracks are visible, you can fix them right away. But if they are underlying your walls or floors, you must call home maintenance immediately.
- Make sure Your Gutter Is Clean: If too many leaves, dirt, or anything else is stuck on your gutter, water can be pooled and create a good environment for mold growth. So you should check it regularly.
- Use Better Insulation: The condensation can occur around windows, doors, or walls, so you should install insulation around these surfaces. You can add weatherstripping to prevent condensation.
- Grow Plants Indoor: Some indoor plants are perfect to cleanse your home’s air quality. But pay attention to the dampness on your potted plant as mold can develop from there. Avoid using faux plants as well.
- Inspect Your Roof After Storm: Weather is unpredictable. But in the worst case, if your house is affected by a storm, the first thing to do afterward is checking your roof for any damage that might cause water to leak.
How to prevent mold in the future? Here’s what you need to know to keep mold from growing as much as possible.
Mold Or Mildew? What Are The Differences Between Them?
Mold vs. mildew, are they the same things? Because they are all annoying fungi that can easily grow and spread on the surface, especially in damp conditions without being well-ventilated. But how are mold and mildew different?
Mold is a fuzzy-appearance fungus with various colors, like black, grey, green, or even yellow. Mold can appear anywhere in your house as mold spores can travel through the air. Their sizes vary from small tiny spots to large ones that can take up your whole walls.
Mildew is also a fungus that can grow flat. Their texture is powdery with grey or white color in early-stage and will turn brown after that. Mildew first appears as small dots, then can spread to whole walls as mold does.
If I compare the devastation of mold and mildew, mold is worse, as it can destroy the structure of your house. Conversely, mildew only makes the surface less pleasant to look at.
This detailed presentation will show you more about mold and mildew.

FAQs
I know how annoying it is if one day you see your beautiful house suddenly has some black spots of mold. And here is some other short information about these ugly living spores that I think you should know as well.
Free Of Mold, Free Of Mind
Indeed, mold can jeopardize your health from minor symptoms such as sneezing, skin rashes, etc., to serious ones like lung cancer. Therefore, once you think your house is affected by mold, removing them is what you have to do.
Do not forget to identify the root problem because mold can recur quickly. So keeping your house dry and clean as much as possible is a must.
Finally, if you think these mold-cleaning solutions are helpful, please spread this information to your beloved people so they can know how to treat mold and, overall, maintain their good health.

References
- sciencenotes.org. 2021. What Is The pH of Lemon Juice? [Online]. Available at <https://sciencenotes.org/what-is-the-ph-of-lemon-juice/>.
- nationalasthma.org.au. 2016. Indoor Humidity and Your Family’s Health [Online]. Available at <https://www.nationalasthma.org.au/news/2016/indoor-humidity>.

Kevin Jones
Founder & Chief Home Organization Strategist
Expertise
Home Organization & Decluttering, Efficient Cleaning Methods & Stain Removal, Sustainable Cleaning Practices, DIY Home Maintenance & Repairs, Space Optimization & Storage Solutions, Budget-Friendly Home Care Strategies
Education
University of Texas at Austin
Kevin Jones is the Founder and Chief Home Organization Strategist at HomeCleaningForYou.com.
He earned a Bachelor of Science in Interior Design from the University of Texas at Austin, focusing on space planning and sustainable design. Specializing in home organization, decluttering, and budget-friendly home care, he helps homeowners create functional and stylish spaces.
Kevin has been featured in lifestyle publications and has collaborated with eco-friendly brands on home organization solutions. He shares his expertise through DIY guides, workshops, and online tutorials. Passionate about minimalism, he enjoys testing new organization methods and exploring sustainable living ideas.